Followup to the last blog. Explanation of expanding a selection to avoid selections that do not have clean edges. And finally we will use the "Paint Bucket" tool to add a light blue color to the selected area.
Saturday, August 29, 2009
Thursday, August 27, 2009
Magic Wand - Part 1
Photoshop Elements has quite an arsenal of Selection tools. We talked briefly about selections in the last blog. It is always a good idea to place items in a photo, that you like to edit, on their own layers. What I didn't say was that you may want to save your final work in two formats - a "PSD" format and/or a "JPG" or "GIF" format. If you save in a "PSD" format you can keep all your separate layers intact so that you can later make changes to these layers. When you save in a "JPG" or "GIF" format, you end up with flattened images -- all layers combined automatically into one image.
In this blog I will introduce you to the "Magic Wand" selection tool. It can be the tool of choice when you have large areas of a similar color to select.

VIDEO TUTORIAL:
In this blog I will introduce you to the "Magic Wand" selection tool. It can be the tool of choice when you have large areas of a similar color to select.

VIDEO TUTORIAL:
Sunday, August 23, 2009
Using Layers
Layers is a very powerful feature of Photoshop. Think of layers as a stack of clear acetate films placed one on top of the other. What if you wanted to do a complete makeover of a model's face. You wanted to change her hair color, lipstick, eye color, add eyeglasses or remove eyeglasses, change her hair style, etc. You could do it on one image but if you were able to isolate each of her features and move them to separate layers, you would have a much easier time of it. You could make each change independent of the other elements of the model's face and then combine the layers into one picture. It seems like a lot of work but in the long run is a much quicker way to accomplish the above.
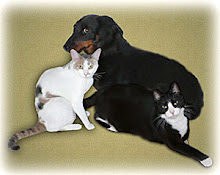
I have a picture on my blog of my three pets - two cats and a dog. They are sitting together without fighting. Impossible!!! But, if I took a picture of each one independently, I could extract each pet onto their own layer and then combine them into one image. I could move the layers around and resize the individual layers to ensure that their sizes relative to each other were correct. That is in fact what I did. Here is what I started with:


Here is the final combination.

True confession: My wife and I love our pets hence we always take a "8 X 10" copy of this picture with us on our travels.
But let me start with a simple example of using layers to show you how to paint clouds into a clear blue sky in order to enhance the picture. I will be using the Buddha picture that was in the last blog along with the "Lasso" and "Brush" tools in Photoshop Elements.
VIDEO TUTORIAL:
AFTER:

Saturday, August 22, 2009
Quick Edit for Removing an Artifact in your Photo
There is another technique that works quite well in removing something from a picture that you wish wasn't there. This method works best when the area you are doctoring is uniform in content, such as a cloudless sky, or a brick wall, etc. We will be using a new tool - the "Rectangular Marquee" tool.
BEFORE:

VIDEO TUTORIAL:
In case you missed it, after you create the rectangle and soften the edges and select the "Move" tool, you must hold down the "ALT" key while moving the selection. If you don't hold down the "ALT" key you will leave behind an empty area in your photo.
AFTER:

BEFORE:

VIDEO TUTORIAL:
In case you missed it, after you create the rectangle and soften the edges and select the "Move" tool, you must hold down the "ALT" key while moving the selection. If you don't hold down the "ALT" key you will leave behind an empty area in your photo.
AFTER:

Friday, August 21, 2009
Using the Clone Stamp - Part 4
One more time with the Clone Stamp tool. There are times when you can speed up the work flow by switching from the Aligned Mode to the Non-Aligned Mode and vice versa.
VIDEO TUTORIAL:
VIDEO TUTORIAL:
Wednesday, August 19, 2009
Using the Clone Stamp - Part 3
I would like to continue talking about the Clone Stamp Tool with a discussion of two different modes or settings used with this tool:
VIDEO TUTORIAL:
- Aligned Mode
- Unaligned Mode
VIDEO TUTORIAL:
Monday, August 17, 2009
Using the Clone Stamp - Part 2
This blog is about using the Clone Stamp Tool in Photoshop Elements. You can see that someone's head got in the way in the photo below. More often than not there is some kind of artifact that shows up in your pictures that you wish you could remove. The Clone Stamp Tool can be the answer to your prayers. There are many tools in Photoshop that can take care of unwelcome artifacts but I am going to stick to the Clone Stamp in this tutorial.
AFTER:

BEFORE:
Video Tutorial:
AFTER:

Thursday, August 13, 2009
Using the Clone Stamp - Part 1
I have promised you that I would create a tutorial on how to eliminate areas of a photo that are undesirable. I talked about doing this in Picasa using the "Retouch" tool. The "Retouch" tool is limited in scope as it is best used for cleaning up small areas. The "Clone Stamp" tool in Photoshop Elements is a much more sophisticated tool and has many uses. Click on the above link - "Using the Clone Stamp - Part 1" - to see an example of a damaged picture that was completely resotred by using the "Clone Stamp" tool.
This initial tutorial covers some of the keyboard shortcuts that will greatly speed up your editing sessions. Also covered will be a description of brush hardness and why you need to use a "soft" brush vs. a "hard" brush.
This initial tutorial covers some of the keyboard shortcuts that will greatly speed up your editing sessions. Also covered will be a description of brush hardness and why you need to use a "soft" brush vs. a "hard" brush.
Tuesday, August 11, 2009
How to Undo "Bad" Edits in Photoshop Elements
This tutorial is about some of the ways one can undo editing mis-steps in Photoshop Elements.
Saturday, August 8, 2009
How to Undo "Bad" Edits in Picasa
I would like to step back from talking about Photoshop Elements and return to Picasa. This blog will show you a number of ways to undo mistakes you might have made in your editing sessions. The video is self-explanatory so let's sit back and watch the demo.
Thursday, August 6, 2009
Camera Distortion Fixes - Part 6


Subscribe to:
Posts (Atom)