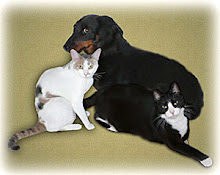
I have a picture on my blog of my three pets - two cats and a dog. They are sitting together without fighting. Impossible!!! But, if I took a picture of each one independently, I could extract each pet onto their own layer and then combine them into one image. I could move the layers around and resize the individual layers to ensure that their sizes relative to each other were correct. That is in fact what I did. Here is what I started with:


Here is the final combination.

True confession: My wife and I love our pets hence we always take a "8 X 10" copy of this picture with us on our travels.
But let me start with a simple example of using layers to show you how to paint clouds into a clear blue sky in order to enhance the picture. I will be using the Buddha picture that was in the last blog along with the "Lasso" and "Brush" tools in Photoshop Elements.
VIDEO TUTORIAL:
AFTER:

No comments:
Post a Comment